Tampilkan postingan dengan label 101 Tees. Tampilkan semua postingan

Selasa, 10 Januari 2012

101 Tees: DIY your own team shirt..... OKC Thunder Pride


 Crafty Girl goes Sporty!


I grew up in a sports family.....games and playoffs were always a part of our family rituals.   College football and The Yankees were generally top dog when it came to our cheering habits.  When I was little it was Boomer Sooner, when I was in school it was The Buckeyes and when I lived in NYC it was the Yankees.

Now that I am a "grown up" married gal (to a husband who is a sports nut) it seems like we are cheering on a different team in a different sport everyday.  Our latest team love is the OKC Thunder.  You would think that the Lakers would rein supreme in our house since we live in LA, but they don't.


It is all about the Thunder.... 


 back of tee - #35 for Kevin Durant
Let's Get Designing

Print a team logo and player number onto printable fabric transfer paper.


Remember to flip the images before printing.


Following the transfer instructions, iron the image to light colored fabric.  I like to use knit fabric.


Once it is cool, lift the paper to reveal the design.


Turn the t-shirt inside out and position the numbers in the top center back of the t-shirt.


Sew around the image with embroidery floss using a running stitch.
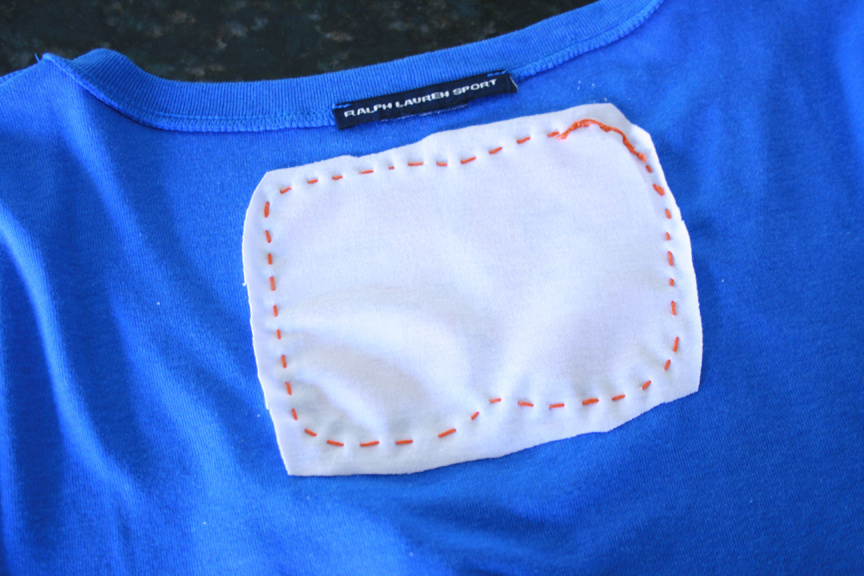

Completed stitches. 


Flip the tee inside out and cut around the image removing the "blue" t-shirt material.  This will reveal the design. 


Attach the second image to t-shirt material.


Position the logo in your desired position.  For this tee, I position it over the upper chest area.  Using embroidery floss and a split stitch sew around the logo.  Trim around logo as close to the stitches as possible.


Detail View.


Add decorative free form stitches to the collar edge.


Glue gems to the tee.

Rabu, 02 November 2011

101 Tees: Jazz up a Scarf with T-Shirt Roses

 Cozy Up with a Fall Scarf!

With a few simple tattered roses made from old tees you can jazz up a plain scarf in just a few minutes.  I used hot glue to make the roses and to attach them, of course you could also use a hand stitch.  To see other tattered rose projects visit this link.


Happy
Thanksgiving!
Cathie


 Begin with a 3 fall colored tees.  

Begin to cut the the tees into strips.

You will 1 strip per rose.  They can be anywhere from 1" to 4" wide.  The narrower the strip, the small the rose.  The length can vary in size too.  19" long is plenty.  You can piece strips together to make a long one.  The longer the strip the wider the rose.


Add a drop of hot to the corner of the strip.


 Fold the strip over.

 Fold the end into a triangle shape.


Fold the and turn the strip in the center to form the center of the rose. Hot glue to secure.

 Bring the strip to the back and glue to secure.


Keep folding, rolling and gluing.  

Secure the end of the strip to the backside with a drop of glue.

Make 3 different colored roses in 3 different sizes.

Hot glue the roses to the end of a scarf.

 Gather some buttons or cover your own with fabric.

Hot glue the buttons in the center of the flowers.

Wear It With Pride!

Kamis, 07 Juli 2011

This one is for you pops - 101 Tees just arrived in the mail!

My next book, 101 Tees - Lark Crafts! 

Available for pre-order at Barnes and Noble, Amazon , Target and Walmart!


I would be a gazillionaire, if I could bottle the feeling I get when a years worth of work arrives at my doorstep in the form of a book!  It has been a long and hard journey....I made 178 designs for the book and 150+ made it to print....but for some reason we call it 101 Tees....???  LOL!


Some projects are harder than others....

This book was particularly difficult to design and write - I guess I should not say difficult since the projects are all easy to make.  A journey is probably a better way to explain it.  You see, when I was first chatting with my editor about the follow up concept to 101 Snappy Fashions and we decided on tees as the next canvas, I did not know the life changes that were around the corner for me and my family.

I had a few of the initial sample designs finished when my father-in-law became ill and was admitted into the hospital.  I was under a pretty aggressive deadline so I was borrowing time from the next day and then time stopped.  It was hard to feel creative.  It was hard to thread the needle.  It was hard to concentrate.  And then I thought about my father-in-law.....he was a successful tailor who had overcome more odds than any other person that I know.

Me and Hrant Filian my dear Father-in-Law

As I visualized his life, him stitching and sewing his way for survival while he was held as a prisoner of war, I was filled with his ambition, his love of the thread and his passion for creating.  I began designing anywhere I could.  The embroidered tee in the above picture I made in his hospital room.  I remember showing it to him and he had such a big smile and giggled when he looked at it.  He gave me a thumbs up.  After he passed away it was hard to make anything.  It was hard to glitter.  Hard to paint.  Hard to think about anything creative. I wish he was here to see the finished book - since it was his life story that got me through the process.

As I flip through the book I am so excited and I know Hrant would be so proud of it!!!!  It is nuts when you see it all put together.   So many talented hands and minds work to make a book, a book!  To celebrate this journey and my latest book, I am going to do a bunch of giveaways and eat a big piece of chocolate cake!

Senin, 14 Maret 2011

101 Tees: Irish You Were Beer


Irish Eyes are Smiling!

 St. Patrick's Day is just around the corner!  You still have time paint up tee and show off your Irish Pride!   For this design I made stencils using freezer paper, you could also use self-stick shelf liner.

Custom cut stencils are a snap to make!  For ease of cutting, always use a sharp craft knife and a self-healing mat.

My latest book,
101 Tees (Lark Books)hits the shelves August 2011!
Pre-Order available at Barnes and Noble or Amazon.

Materials:
Paper Printed with an Irish saying
Green T-Shirt
Marker
Freezer Paper or self-stick shelf liner
Craft Knife
Self Healing Mat
Ruler
Iron
Stencil Brush
FolkArt White Fabric Paint

Steps:
1.  Begin by printing an Irish saying onto a piece of paper.  Chunky letters work best.  Re-size the letters as needed.

2. Make a stencil of the saying by laying freezer paper (wax side down) or shelf liner over the words.  Tape both pieces to the self-healing mat. Use the sharp craft knife to cut out the design leaving a border around the design.

3. Position the freezer paper stencil in the center of the tee. Use a warm iron to attach the wax side of the paper to the tee. For shelf liner, stick the cutout design to the tee. Stick the insides of the letters to the tee.  (this is for letters like o, a b)

4. Dab a stencil brush in white fabric paint. You want to work with a semi-dry brush, so tap off enough excess paint. Working up and down, tap the brush over the stencil.  Allow the paint to dry. Peel off the stencil and follow the manufacturer’s instructions to heat set the paint.

Sabtu, 08 Januari 2011

DIY Silkscreen Kits on HSN - Sunday (9th) Late Night and Monday (10th) Morning

I am heading out to Home Shopping Network in the morning. I am traveling across the states to St. Petersburg, Florida. It will be a whirlwind trip without much sleep. It is always a fun adventure and you never know what will happen on live TV. hehe

I am showcasing six different DIY Silkscreen Kits that are made with Simply Screen screens by Plaid. You may remember the screened projects I did for Better Homes and Gardens - if not, have a peek at them here.  If you miss the shows.....and want to learn more about or purchase the kits, you can visit this link to see all the kits at HSN.


Monday - January 10th - Home Shopping Network

Tune in or Record
SEW CRAFTY (1:00 AM Eastern)
or HSN TODAY: SEW CRAFTY (8:00 AM Eastern)


Here is my T-shirt that I made for the shoot!

 Step 1: Position your screen.

  Step 2: Apply a bead of paint across the top.

 Step 3: Drag the paint down the screen.

 Step4: Lift the screen to reveal the design.

 Wanna Know more about the kits???
They Are Slumber Party Perfect!
Each screen can be used 20 times!!

Express yourself through fashion. Create your own graphic tee in minutes using the paints and embellishments in this kit. Add one or more colors, a little sparkle or bling—it's all up to you! Then show off the wild, one-of-a-kind shirt that you created.

Each Kit Has:
* 6 silkscreen designs (2 sheets)
* Technique guide
* 3 paint colors
* Applicator
* 6 glitter packs
* 12 plastic jewels
* 25 plastic pearls
* 250 assorted sequins
* Adhesive
* Brush

Notes:
* Easy-to-use
* Makes 10+ projects
* Reuse screens up to 20 times
* Six cool design
* Print on tees, hoodies, bags and more
* For ages 8 and up 

more info: Dream Kit

 more info: Peace Kit


 More info: Skulls Silk Screen Kit

 More info: Alphabet Kit

Jumat, 07 Januari 2011

101 Tees: Lacy Tee Makeover

My lacy top makeover.

As an ex-costumer for film, I can't help but be obsessed with my outfits for filming.  I love shopping for them, altering them and choosing just the right accessories for them.  My sister helps me, I plan way in advance and I drive my hubby nuts with my makeshift fashion shows.


I fell in love with this lacy tee with ruffled sleeves but the color was so WRONG for me! The price was $14.99, so that was perfect.  I can't stand spending big bucks on clothes for filming because they always get ruined with paint and Mod Podge.  I guess ruined sounds harsh....lets just say they get enhanced with craft supplies.  :)


I had two options.
1. Return the shirt.
2. Dye the shirt.

As you can see, I whipped up a batch of hot water and wine colored RIT dye.  I soaked a my pre-washed tee for about 20 minutes in the dye bath.

Then I rinsed her clean, washed in cold and hung dry.  It turned out perfect!!!  I was jumping for joy!  My made-over tee and made it's TV debut today.  I wore it for the Kitschy Kitchen episode of  Plaid Craft TV.