Tampilkan postingan dengan label Kids Crafts. Tampilkan semua postingan

Senin, 16 Januari 2012

Make it: Grown Up Paper Beads and Rose Quartz Necklace


 On the set of Creative Juice...making beads and stringing them up.

  
Make it: Paper Beads
Re-Craft tiny scraps of paper into pretty beads.

Materials:
Mod Podge - gloss
Colorful wrapping or scrapbook paper (glossy works best)
Scissors
Bamboo skewers

1. Cut paper into triangles approximately 1" or less across the bottom and approximately 2" long.

2. Apply Mod Podge to the back of the paper.

3. Starting at the wide end of the paper, roll it tightly around a bamboo skewer.

4. Apply glue to the last 1/2" of the paper (the pointed end) and roll into place. Once it dry, apply Mod Podge over the surface of the beads to create a glossy finish.


Make it: Paper Bead and Rose Quartz Necklace

Materials:

2 paper beads
clasp
chain (long enough to make necklace the desired length)
decorative beads (here, two beads were used, one large and one small rosy quartz)
2 jump rings
2 crimp beads
wire cutters
round-nose jewelry pliers
1 head pin

1. Cut a length of chain to use as the base of the necklace.

2. Slide rosy quartz beads onto a head pin. With the wire cutters, snip off the head pin excess, leaving enough to make a loop. Use round-nose pliers to form a loop at the end of the head pin.

3. Locate the middle point of the chain and attach the bead charm you just made to this point. Use pliers to open the loop of the head pin and attach it to the link in the middle of the chain.

4. Slide paper beads onto the chain, putting one on each side of the charm.

5. With round-nose pliers open up the jump rings and attach one to each end of the chain. Attach one half of the clasp to one of the jump rings and the other half of the clasp to the other jump ring. Close the jump rings with the pliers.

Jumat, 06 Januari 2012

Kids Craft: Saucy Monster

Kids Craft: Saucy Monster


I have a great new project for kids - they are kind of like Japanese characters meets Cousin It. I am calling them saucy monsters. Boys and girls really love this project. They also double as banks, secret spots etc. - because you can lift the hair out and place coins (etc) into the bottle.

Plus if you have any "eyelash" yarn it is great way to use it up. I really love the glow in the dark Mod Podge and kids really love it!

They are made with a plastic salad dressing bottle or a Gatorade style bottle.


Here are the instructions:

1 plastic bottle (large opening at the top)
1 yard cheese cloth
Mod Podge - Glow in the dark
Crazy yarn
Googley eyes
Craft glue
Foam paint brush

1. Clean the bottle and peal the label off as best you can.
(you could spray paint them black if you want to)

2. Unfold the cheese cloth and begin attaching it to the bottle with the Mod Podge. Wrap like a mummy and keep adding the Mod Podge. Use your fingers to press down. Set aside to dry.

3. Make the hair by wrapping crazy yarn around a 10" piece of cardboard (or you could use a yellow note pad) until you have a full amount if hair. Cut a small piece of yarn and place it towards the top, bring it through all the loops and tie a secure knot. At the other end, use scissors to cut the hair loose.

4. Glue googley eyes to the front.

5. Add the hair by placing the knot side into the opening on the bottle. You might need to trim the hair of your monster.


Milk Mummy
another variation using milk cartons

Kamis, 04 Agustus 2011

make it: Play Cake

This little cutie is is calorie free and loaded with sweetness! 

What you will need:
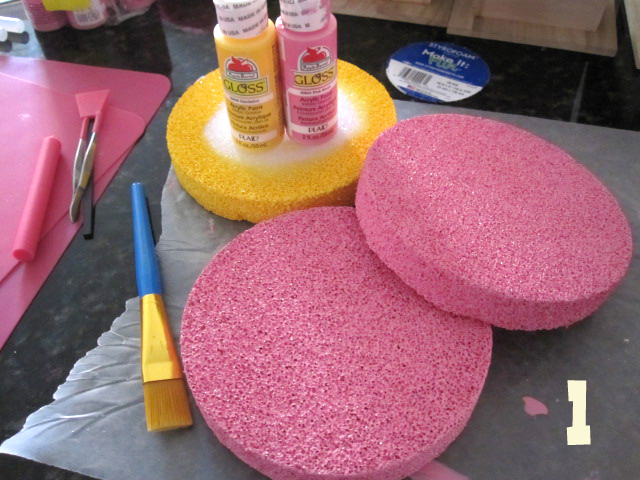
3 Styrofoam Circle Disks
Apple Barrel - Pink Paint
Apple Barrel - Yellow Paint
Paintbrush
Hot Glue
Ribbons
Silk Flowers
Pom Pom Trim
Small Canned Food
Lid To a Plastic Tub

Let's Make It!

 Paint two of the disks pink and paint one of the disks yellow.  The Apple Barrel paint sinks into styrofoam making it the perfect choice for this project.  Bonus...this paint is also one of the least expensive acrylic craft paints!

Add hot glue to the top of on of the pink disks.

 Layer the yellow disk on top of the pink disk.

 Hot glue the second pink disk on top of the yellow disk.

 Working on one of the disk seams, hot glue a band of ribbon around the cake.

 Repeat for the other seam.

 Hold the paper flower with the HGGH tweezer. 
Add hot glue to the back of a paper flower.

 Position around the top of the cake.

 Continue around the cake.

Working in between the the ribbons, add flowers to the sides of the cake.

Hot glue a jumbo flower to the top of the cake.

Use the paddle so you don't crush the flowers.

Working on the bottom of the cake, hot glue pom pom trim around the cake.  Use your finger cap so you don't burn your finger!

 Remove the label from the can.

 Hot glue ribbons around the can.

Hot glue the lid to the top of the can.
Use the press wand for a firm press.

Link Parties

Kamis, 14 Juli 2011

New twist on Coffee Filter Flowers.


I have been making coffee filter flowers with kids for years!  We showcased a version of them using food coloring to dye them on episode 110 of Creative Juice.   Now we are using paint and glitter paint to add the bold pop of color to the flowers.  For the vase we recycled a chip can. The can was coated in Mod Podge, wrapped with paper and decorated with Popsicle sticks and paper flowers.  This project was designed for Plaid.....Please visit this link to see all our Plaid Projects.

Let's Make!

For the Vase:
Flower Print Scrapbook Paper 12X12
Chip Tube - Cleaned (Pringles works well)
Scissors
Ruler and Pencil
Foam Paintbrush
Mod Podge ® Matte
2 Wood Popsicle Sticks
FolkArt ® Acrylic Colors - Citrus Green
Craft Glue
Paper Flowers, Buttons, Scrap Ribbons


Steps:

1. Wrap the scrapbook paper around the cleaned chip can. Trim the paper to fit around the can with a little over hang on the ends. Coat the back of the paper with Mod Podge. Position the paper on the chip can. Top-coat with a coat of Mod Podge. Use your fingers to press out any air bubbles. Smooth your brushstrokes. Allow to dry.

2. Paint the Popsicle sticks Citrus Green. Allow to dry. Cut one of the sticks in half. Glue the sticks to the chip can in the style of flower stems.

3. Glue flowers and buttons to the flower stems. Glue ribbon around the top of the chip can.

For the Flowers
Scrap Ribbon Coffee Filters (2 per flower)
Wax paper
FolkArt ® Extreme Glitter™ - Turquoise
FolkArt ® Artists Pigments™ - Aqua
Foam Paintbrush
Bamboo Skewer (1 per flower)
Green Yarn (1/2 yard per flower)
Instructions

Steps:

1. For each flower you will need to paint two coffee filters. Open and flatten the filters. Place them on wax paper. Dry-brush paint the flowers. Begin with a small amount of Aqua paint on your brush. Lightly paint the filters working from the inside of the circle to the outer edge. Leave white spaces to add highlights to the flowers.

2. Add glitter highlights by randomly painting a coat of Turquoise Extreme Glitter over the filters.

Place the two filters wrong-sides together. Pierce the center with the bamboo skewer. Slide the filters to almost the end of the skewer. Add a drop of glue and scrunch the filters to form a flower.

Tie a piece of yarn around the bottom of the flower. Wrap the yarn around the base of the flower and to the skewer-stem, tie the end in a knot to secure.

Tip Junkie handmade projects

Sabtu, 11 Juni 2011

Book Review and Giveaway: Big Little Felt Universe


Fun fun fun!  When I first picked up the new book, Big Little Felt Universe by Jeanette Lim, I was  smitten with the designs and surprised by all the step-by-step photos.  I also loved the life-size patterns.  (resizing is always a pain......) Jeanette was able to capture some wonderful play toys with felt.  Her designs are part whimsy and part realistic.  The cost of making the toys would be minimal - all you really need is felt, thread and stuffing.  I give this book two-thumbs up for fun!

Win This Book
(and a few other secret goodies too)

To enter just leave a comment with your contact info!
Open to USA and International addresses.
Please only enter once.
Contest will be open until 6/18/11.
Winner will be drawn at 7:00 PM west-coast time.


Lets Peek Inside
 
I love play food so this cake was a favorite of mine!

I have seen it all now!  The camping set is too cute and the instructions are easy to follow.

I can think of 9 little girls who would LOVE this!  I have 9 nieces and when they were little this would of been a hit.  The patterns and ideas in the Purse chapter are perfect!  This chapter features patterns for cell phones, lipstick, wallet and even a little compact.

Of course I love the scissors in the Office chapter!  How cute are they?  This chapter also features patterns for a calculator, laptop and a little mouse.

Rabu, 11 Mei 2011

Plaid Craft TV: Kids Play Kitchen and Toy Cake


Learn How! Watch the Video

A dream-come-true for budding chefs: a pint-size kitchen made with love and FolkArt acrylic paint! Games, make-believe and simply sweet décor have been specially created for the younger set. Stay tuned for all three Kids' Activities segments and bonus projects, too!


bonus idea below!


This bonus idea is perfect making toy cakes, pies or cupcakes.  For this we used recycled elements, paint and styrofoam disks.  For the instructions for the designs pictured visit this link.

Sabtu, 12 Maret 2011

Kids Craft: Chip Can Rocket Ship

Kids Craft:
Chip Can Rocket Ship

Transform an ordinary chip can into an amazing, imagination-blasting rocket! All you need is a tall chip can, construction paper and imagination!  Kids will love personalizing their rocket-ships.

Materials:
potato chip can
Folkart silver craft paint
construction paper
glue stick
rubber band
small scraps of paper
glitter paint
corrugated paper
Folkart silver craft paint

Steps:

1. Glue construction paper around the can; hold the paper in place with rubber bands until dry.

2. Add an oval window, star details and glitter.

3. Cut a half circle out of construction paper, slit halfway up from the flat edge, twist together to form a cone and glue in place.

4. Cut a paper towel roll in half, cover with construction paper and glue to the body of the rocket.

5. Add cut triangles of corrugated paper for fins. Paint them silver, let the paint dry and attach them to the rocket.

6. To make the rocket zoom across a room, cut a drinking straw in half and attach with hot glue to the center body of the rocket. Thread monofilament through the straw and run the line across the room. Pull the rocket to one end of the room and push across the room.


Minggu, 16 Januari 2011

Senin, 07 Juni 2010

Make it: Mermaid Doll


Don’t throw away those scraps! Spare felt, yarn, and ribbons are the key ingredients for this incredibly easy mermaid doll.

Supplies:
Cotton twill fabric – body color
Sewing machine or hand-sewing needle
Matching thread
Pillow stuffing
1 –2” wide ribbon/tail base, 6” long
Assorted ribbons, 20-30 pieces (10-18” long)
Fusible hem tape (such as Stitch Witchery)
Felt: 1 body color, 1 orange, 1 bluegreen
1 skein eyelash yarn (for hair)
Iridescent dimensional paints (sea greens, blues, silvers)
Fantastic Face doll iron-on transfer
15 – 20 shell buttons
4 dozen small pearls
White embroidery floss
6 mini seashells
Hot glue gun
Bone folder
Iron
Pressing cloth
Pins
Tailor’s chalk / pencil

Click to save and re-size larger or smaller.


Steps:
1. To create the mermaid body: trace the doll body template onto cotton twill fabric and cut two. Pin pieces together, right sides facing, and stitch with a ¼” seam leaving the bottom straight edge open. Use scissors to cut notches around the curves and turn right side out using a bone folder from the inside to smooth out the shape.


2. Lightly iron the head portion of the mermaid, warming it. Place Fantastic Face Iron-on Transfer doll face in the center of the head, face down, and cover with a pressing cloth. Firmly iron for approximately 25 seconds on medium-high heat. Do not move the iron too much or the face will shift. Remove the pressing cloth, allowing the transfer to cool for 10 seconds, and then slowly remove the transfer backing. Set the face by ironing lightly again with the pressing cloth.

3. Fill the mermaid body with pillow stuffing using a bone folder to push the stuffing all the way into the head area. Leave 1” of slack fabric at the open end to insert the tail.


4. Create the tail by laying the 2” wide ribbon tail base horizontally on your work surface. Place a piece of fusible hem tape, cut to size, on top of the ribbon. Begin layering the 10-18” long ribbons vertically along the tail base. Alternate a layer of tail ribbons and a layer of fusible bonding web, but do not make more than 4 layers or it will be too difficult to stitch through. Finish with a last piece of fusible web and fold the edges of the tail base ribbon back over the layered pieces to create a closed wrap. Be sure that the width of the tail will fit into the bottom of the doll. Firmly iron on both sides, using a pressing cloth, until the webbing melts and secures all of the tail ribbons.

5. Insert and pin the tail base into the open end of the mermaid body, folding under raw edges of body fabric to make a finished edge. Stitch closed using a zipper foot.

6. Use dimensional paints to create the tail scales. Start halfway down the body and paint 1” arches, facing down, across the front waist and fill in with paint. Alternate colors (4 or more works best) to differentiate each scale from another. Repeat this process down the front of the doll body and onto the tail base ribbon to blend them together. Allow the paint to dry for 24 hours, and then repeat for the backside.


7. Create a belt, by sewing shell buttons onto a piece of ribbon, using hot glue to attach it to the mermaid body, covering where the scales start.

Click to save and re-size larger or smaller.

8. Cut out felt arms, shell bikini top and starfish using the given templates or create your own. Attach using hot glue or Fabric-Tac glue.

9. Give your mermaid a necklace by threading the small pearls onto 12” of embroidery floss and tying around her neck, trimming excess floss.

10. Create knots of eyelash yarn to become hair by tying strands of yarn together in the center. Make several bunches of three different lengths. Hot glue on the hair knots starting with the long knots along the back of head (ear to ear), then medium ones framing the face, and finishing with the small one on the crown of her head. Finish off your mermaid by giving her a tiara by hot gluing 5-6 small shells along her hairline.

Kamis, 04 Februari 2010

Make it: Kids Valentine Wreath


Kids Project – glitter heart wreath

Materials:
Folkart paint 413 pink
Folkart Extreme Glitter hologram
Folkart paint 437 lipstick red
Folkart Extreme Glitter red
9 wood hearts
Foam paintbrushes
Ribbon
Hot Glue or tacky glue
Cardboard circle

Steps:

1. Paint 5 of the hearts pink and 4 of the hearts red. Allow to dry. Top coat the pink hearts with 3 layers extreme glitter hologram. And, the red hearts with 3 layers of red extreme glitters.

2. Glue 4 pink hearts to the center of a circle. Layer and glue 4 red hearts over the pink hearts. Glue a pink heart in the center.

3. On the back, glue a ribbon to serve as a hanger.

Selasa, 10 November 2009

Make a Kids Felt Book

Make a Kids Felt Book

Keep the kids occupied on long road trips or flights with a travel book that combines a little felt, some buttons, ribbons, and snaps, and a lot of imagination. The book can be customized in so many different ways....the sky is the limit! Have fun getting creative!

Supplies:
3 Ring binder
Zipper binder pouch
Felt rectangles– 2 per page
5/8” grommets – 3 per page
Small scissors
Grommet setting tool
Self-healing mat
Decorative scissors
Fabri-Tac Glue
Scissors
1 piece of 3 hole punched paper
Marker

Decorating pages supplies:
Buttons
Lacing
Ribbon
Felt scraps
Rhinestones
Beads
Charms
Permanent markers
Snaps
Snap setter
Additional grommets
Fabri-Tac glue

Steps:

1. Use fabric tack to glue two rectangles of felt together. Allow the page to dry.

2. Lay a sheet of 3-hole punched paper over the felt squares, use a marker to mark the position of for the holes. Use a small pair of scissors to make a very small snip where each grommet will be attached.

3. Push the male piece of the grommet through the hole. Flip the felt page over insert the female piece of the grommet over the male. Attach the grommets using the grommet setter and a hammer. Repeat for the other two grommeted holes on the page.

4. Cut around the edges of the page with decorative scissors.

5. Repeat steps 1-4 for each page you wish to make.

6. To make a “Buttons & Snaps” page: Cut two small identical panels of felt and attach two grommets to each panel to make a “lacing section”. Place in the desired location on the page.

7. Cut another shape from felt for the “snap” section. Using a purchased snap kit, attach the male piece of the snap to the top of the shape using a snap setter. Attach the female piece of the snap at the appropriate position on the page by cutting a small hole, pushing the piece through to the front and using the snap setter. Snap the felt piece to the page.

8. Cut another shape from felt for the “button” section. Slice a small hole into the felt shape to make the button hole. Use a pen to mark where the button should be stitched. Stitch the button using a needle and thread. Button the felt piece to the page.

9. Use Fabri-Tac Glue to attach the outside edges of the grommeted lacing panels, the bottom of the snap panel, and one side of the button panel to the page. Allow the glue to dry.

10. When the page is dry, add decorative stitching such as whip-stitching where the panels attach to the page. Lace the grommets of the lacing section with narrow ribbon.


Other Ideas for decorating pages:

Seek and Find Page: This is great for road trips! Make cut outs of road sings, buildings, cars, animals, trucks, etc. Use craft glue to attach them to the page. Have the kids look for them while on long trips.

Alphabet game: Cut out each letter of the alphabet and attach to a page. Look for the letters on buildings and signs as you head down the road

Tick Tack Toe: Cut strips of felt and glue them in the crisscross pattern. Ct X’s and 0’s for the game. The game pieces can be stored in the zipper pouch.

Lacing: Cut a shoe out of felt and attach mini grommets to the shoe, add a shoelace. This great way for kids to practicing tying.

Getting Dressed: Cut out a small felt person and attach to the page. Cut out all sorts of clothing, shoes, hats and accessories. (store the clothes in the zipper pouch) Kids will be entertained four hours getting them person dressed.

Counting: Cut out numbers and/or mathematical symbols (age appropriate) for counting and adding.