Tampilkan postingan dengan label Plaid Craft TV. Tampilkan semua postingan

Rabu, 11 Januari 2012

Video: Mod Podge Frame with Zipper Flowers Made with Hot Glue


Have you seen those frames at the craft stores that are under $2 and sometimes only a buck!?! They are awesome for altering.  For this project we used tissue paper from a pattern and zippers to create this look.

Kamis, 22 Desember 2011

Webisode: Luminary Making


Whip up a quick Luminary for a last minute holiday gift or decorating idea.  To tint the Mod Podge, we are using broken eyeshadow.  Complete instructions are here>>> Luminaries.

Rabu, 07 Desember 2011

Plaid Craft TV: Photo Pendants


Photo Pendants!
These are so easy and fun to make. 
Perfect for gift giving!

Supplies:
Folkart – Artists Pigment Black 479
Folkart Acrylic Paint Metallic Gunmetal Gray 667
Mod Podge Gloss
Dimensional Magic
Chain
1.5” Wooden Nickel Disk
Paintbrush – detail
Laser Copied Photo (shrunken to fit the wooden nickel)
Marvy Circle Punch 1.5”
Foam Paintbrush
Rhinestones – Various Sizes and Colors
Pliers
Heavyduty Glue – E6000
Scrap Piece of Paper or Felt
2 Yards Vintage Seam Binding or Soft Ribbon


Steps:
1. Begin by painting the wooden nickel disk with black paint. Once dry, paint the rim of the disk with metallic gray paint. Dry-brush for an antique look.

2. Punch the copied photo with the circle punch. Coat the back of the punched photo with Mod Podge. Position the paper on the wood disk. Press with your fingers to remove any air bubbles. Top-coat with a layer of Mod Podge. Allow to dry.

3. Glue the rhinestones around the top edge of the disk with Mod Podge. Allow the glue to dry.

4. Apply a thin coat of Dimensional Magic to the top of the disk. Apply over the image from edge to edge. Allow to dry in a non-drafty place. Don’t move until dry.

5. Using pliers, remove one large link from the chain. Using heavy-duty glue, glue 1/2 of the link to the top center back of the wood disk. Glue a scrap of paper or felt over the ring to hid it.

6. Cut a 4” piece from the seam binding. With strip, tie the pendant to the center of the chain. Cut the remaining piece of seam binding in half. Thread each one through the ends of the chain and tie in a knot. To wear, tie around the neck.

Rabu, 21 September 2011

Plaid Craft TV: Altered Cowgirl Apron and Bonus Kitchen Linens!


Plaid Craft TV: Cowgirl Inspired Altered Apron

In this episode we are altering a $4.00 apron into a cowgirl shabby apron.  We used paint, stencils, rhinestones, iron-ons, etc.  This is one project where anything goes.  We have a bonus idea...we are using iron-ons to quickly transform place-mats and dishtowels. 


Country Cowgirl Apron Materials:
Folkart Acrylic Paint – Butter Pecan 939
Folkart Acrylic Paint – Summer Peach 2549
Folkart Acrylic Paint – Fuchsia 635
Folkart Acrylic Paint – Ballet Pink 438
Folkart Acrylic Paint for Fabric Metallic Inca Gold 4430
Folkart Acrylic Paint for Fabric Metallic Copper
Plaid Metallic Foil Iron-ons 93226
4” Icon Stencils 29364
Apron (Washed and Light Colored)
Masking Tape
Foam Paintbrush
Stick of Hot Glue
Iron and Press Cloth
Scrap of Fabric (light colored)
Embroidery Floss and Needle
Rhinestones
Gem Glue
Ruffle Trim
Sewing Machine

Steps:

Lay the apron flat and apply evenly spaced masking tape from top to bottom. Press the edges of the tape to ensure a good bond.

Using a foam paintbrush and Butter Pecan paint, dry brush paint in between the tape. Add highlights of gold paint, by dry brushing Metallic Inca Gold over the Butter Pecan. Allow to dry and remove the tape.

Dip the end of a hot glue stick into Ballet Pink paint. Press the glue stick onto the apron in the strip area, continue painting until the stripe is polka-dotted. (where the tape was) Repeat this process adding a few dots per stripe with Summer Peach paint.

Working in the corner, position the star stencil on the apron. Using a spouncer paintbrush and Metallic Copper paint, stencil 3 stars onto the apron. Allow to dry.

Heat set all the paint by placing a pressing cloth over the paint, iron with a hot iron no steam.

Adhere the iron-on to the light colored scrap fabric. Follow the package instructions. Cut around the iron-on design and sew to the apron near the stars. Using embroidery floss, hand sew a running stitch around the star shapes.

Using gem glue, attach the rhinestones to the center of the Summer Peach polka-dots. Sew a ruffle trim around the sides of the apron. Sew a double ruffle across the top of the apron.

************************************

Bonus Idea:
Embellished Placemats and Dishtowels

You can quickly alter dishtowels, place-mats or other kitchen items with iron-ons.  So fast so fun!


 Artsy Appliqué 94491 Cherries

 Artsy Appliqué 98106 Apple 

Artsy Appliqué 98097 Modern Tree


Following the package instructions, attach 1 or more iron-ons to either a placemat or a dishtowel.

For extra embellishment, sew a running stitch around the outer edge of the placemat, glue rhinestones to the iron-ons or add additional trims by sewing or fabric gluing them to the material.

Jumat, 16 September 2011

Plaid Craft TV: Strawberry Painted Sneakers


Plaid Craft TV: Strawberry Painted Sneakers

In this episode of Plaid Craft TV we are freehand painting strawberries and daisies onto garden sneakers.  They are very simple to make and the same technique can be used on almost any surface...wood, glass, clay pots, etc. 


Materials to Gather:
Flat Top Slip-on Sneakers
FolkArt Fabric Paint – 4415 Yellow Citron
FolkArt Fabric Paint – 4414 Yellow Light
FolkArt Fabric Paint – 4403 Magenta
FolkArt Fabric Paint – 4417 Hauser Green Medium
FolkArt Acrylic Paint – 480 Titanium White
Detail Paintbrush
Medium Flat Paintbrush
Gems
Gem Glue


To Make:
1. Using a medium paintbrush and Magenta paint, paint a narrow heart shape for each berry you want to paint. Add paint across the top to fill in the heart and for a berry. Blend a tiny amount of White paint into the Magenta paint. This will create a lighter shade. Using the same brush, paint over the berries with the lighter color. Paint only on one side of the berry. This creates a highlight as if the sun was hitting the berry. Using the detail brush and white paint, paint the seeds of the berry over the highlighted areas. Allow to dry.

2. Paint the flowers, by dipping the medium brush into Yellow Light paint, tap off the excess paint. Paint 5 petals for each daisy. For small daisies, just paint little tiny buds. Blend a small layer of White over the yellow to add highlights. Dip the handle end of the paintbrush into Magenta paint, swirl the paint on the center of each flower. Allow to dry.

3. Using a detail paintbrush and Yellow Citron paint, paint free flowing vines and stems for the strawberries and flowers. Use the same paint to paint stems on the berries. Paint small notches to be buds. Using Hauser Green and a detail brush, paint stems top and leaves to the vines. Allow to dry.

4. Add gems to the center of the flowers with gem glue.
Segment 3 - Bonus Idea: Plaid and Berry Sneakers

Bonus Designs:

1. For the plaid shoes: Load half the paintbrush with Magenta paint and the other half with Yellow Light paint. Paint vertical stripes down the front of the shoe. Leave a little space in between the stripes. Using a detail brush and Yellow Citron, paint narrow strips in between the first painted stripes. Using the same detail brush, paint horizontal stripes over the vertical stripes. Use Magenta and Yellow Citron for the horizontal stripes. Use gem glue to attatch a crochet flower and gem.

2. For the large berry: Using a medium paintbrush and Magenta paint, paint a wide heart shape for each berry you want to paint. Add paint across the top to fill in the heart and for a berry. Blend a tiny amount of White paint into the Magenta paint. This will create a lighter shade. Using the same brush, paint over the berries with the lighter color. Paint only on one side of the berry. This creates a highlight as if the sun was hitting the berry. Using the detail brush and white paint, paint the seeds of the berry over the highlighted areas. Paint stems using Yellow Citron and Hauser Green paint. Allow to dry. Glue tiny gems to the shoes with gem glue.

Rabu, 07 September 2011

Plaid Craft TV: How to make a garden tool wind chime


In this episode of Plaid Craft TV we are transforming a plain wood bird house and some garden tools into a wind chime!  Perfect for making some funky yard art!  Our bonus idea is a sweet painted clay pot.  (instructions for both are below)  Steve and I were so thrilled to have fellow crafty friend, Stefanie Girard, joining us in the studio.

Steve and I met Stefanie years ago at a publishing event at CHA and although we get to play together, this was the first time we got to craft together.  Stefanie is helping Steve with the chime and is making recycled sweater flowers from her book Sweater Surgery.  Stefanie writes for many of my favorite crafty websites...craft gossip and craftside.  She also invented this really cool binder for storing greeting cards.  I was lucky enough to get a sample the other day...planning a post on that soon.

Kick back and enjoy the video!  We made this one bright and cheery with bold colors.....but the same idea could be made rustic with crackle paint and worn out tools.  Oh and we are using Outdoor Mod Podge...perfect for all weather projects.

 
Garden Tool Wind Chime

Materials to Gather:
1 Large Plaid Birdhouse
5 Eye Hooks
FolkArt Outdoor Paint – 2592 Lime Green
FolkArt Outdoor Paint – 1611 Baby Pink
FolkArt Outdoor Paint – 1614 Engine Red
Foam Paintbrush
Detail Paintbrush
Mod Podge – Outdoor
Paper Punches – Flower Shape
Scrapbook Paper
4 Garden Shovels
Fishing Line
FolkArt Outdoor Sealer (Gloss or Satin)
Optional Embellishments: Recycled flowers, buttons, silk flowers

To Make:
1. Screw 4 eye hooks into each corner on the base of the birdhouse and 1 eye hook into the top center of the roof.

2. Paint the roof Engine Red, the base of the house Lime Green and body of the house Baby Pink.

3. Using Lime Green paint and a detail brush, paint flower stems on the front of the house. Using Mod Podge Outdoor, apply paper-punched flowers to the tops of the stems.

4. Trim the scrapbook paper to fit around the handles of the shovels. Coat the back of the paper with Mod Podge Outdoor, wrap the paper around the handles, smooth the paper with your fingers and topcoat with a layer of Mod Podge.

5. Topcoat the entire birdhouse and shovels with FolkArt Outdoor Sealer.

6. Attach the shovels to the eyehooks with fishing line. Add additional embellishments to the birdhouse.

Bonus Idea: Painted Clay Pot

Materials to gather:
Clay Pot
FolkArt Outdoor Paint – 1610 Wicker White
Foam Paintbrush
1” Flat Paintbrush
FolkArt Outdoor Paint – 1611 Baby Pink
FolkArt Outdoor Paint – 1618 Burnt Umber
Detail Paintbrush

To Make:
1. Paint the base of a cleaned clay pot Whicker White. Dip the 1” brush into Baby Pink paint and paint stripes down the sides of the pot. (leave a white spot for painting the bird) Paint the rim of the pot with Burnt Umber.

2. To make the bird, pant a simple bird body in the white section. Use a detail paintbrush to paint a wing, feet and a beak in Burnt Umber. Us the same brush to paint an outline around the design.

Rabu, 24 Agustus 2011

Plaid Craft TV: How to make a shabby birdhouse condo


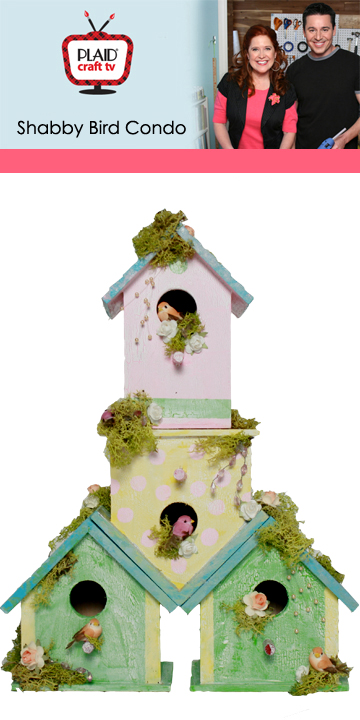
In this episode of Plaid Craft TV we are transforming plain wood birdhouses into a birdhouse condo with a shabby chic beach vibe.  We are using crackle finish and faux patina to create the distressed look.  We added reindeer moss, paper flowers and tiny birds to the condo with hot glue and of course we used Hot Glue Gun Helpers so we didn't burn our fingers.  To see more videos visit our pages at youtube: Plaid Craft TV at youtube or CathieandSteve at youtube.

Plaid Craft TV - Shabby Birdhouse Condo

Materials to Gather:
3 matching Plaid Birdhouses
1 Different Plaid Birdhouse (this is the topper)
Foam Paintbrushes
Detail Painters
Paper Towel
FolkArt Outdoor Paint – 1632 Calypso Sky
FolkArt Outdoor Paint – 2592 Lime Green
FolkArt Outdoor Paint – 1661 Lemon Custard
FolkArt Outdoor Paint – 1611 Baby Pink
FolkArt Outdoor Paint – 1633 Light Blue
FolkArt Outdoor Paint – 1642 Silver Sterling
FolkArt Outdoor Paint – Crackle Medium
FolkArt Outdoor Paint –1610 Wicker White
FolkArt Outdoor Paint – Blending Gel
Hot Glue
Hot Glue Gun Helpers
Embellishments: tiny birds, moss, paper flowers, pearl sprays

To Make:
1. Paint all the roofs with Calypso Sky. Paint two if the matching houses Lime Green. Paint the other matching house Lemon Custard. Paint the topper house Baby Pink. Paint details like stripes or polka-dots onto each house.

2. Faux patina the roof by dipping a scrunched up paper towel into Light Blue and Sterling Silver paint. Dap the paper towel onto the roofs of the houses.

3. Paint a layer of Crackle Medium over each house and roof. Allow the Crackle Medium to dry thoroughly. This is very important.

4. Blend 1-part Blending Gel with 1-part Whicker White. Working quickly, paint the mixture over the entire house and roof. This will create a crackled wash. Repeat for each house.

5. Place two matching houses on your work surface (side by side), turn the other matching house upside down and glue the roof to the roofs of the other two houses. Glue the topper house the base of the upside down house.

6. Embellish the condo further by hot gluing moss, tiny birds, paper flowers and pearl sprays to the houses, roofs and openings.


Plaid Craft TV - Shabby Birdhouse Condo

Materials to Gather:
1 Large Plaid Birdhouse
Hand Saw
Old Bottle for Vase
Foam Paintbrushes
FolkArt Outdoor Paint – 1632 Calypso Sky
FolkArt Outdoor Paint – 2592 Lime Green
FolkArt Outdoor Paint – 1661 Lemon Custard
FolkArt Outdoor Paint – Crackle Medium
FolkArt Outdoor Paint –1610 Whicker White
FolkArt Outdoor Paint – Blending Gel
Hot Glue
Hot Glue Gun Helpers
Embellishments: tiny birds, moss, paper flowers, pearl sprays

To Make:
1. Using the size of your bottle as a guide, cut a hole in the top of the bird house. The bottle should be able to slip into the hole and rest on the floor of the house.

2. Paint the house with Calypso Sky. Paint the base Lime Green. Paint the roof Lemon Custard. Paint the topper house Baby Pink. Paint details like stripes or polka-dots onto each house.

3. Paint a layer of Crackle Medium over each house and roof. Allow the Crackle Medium to dry thoroughly. This is very important.

4. Blend 1-part Blending Gel with 1-part Whicker White. Working quickly, paint the mixture over the entire house and roof. This will create a crackled wash. Repeat for each house.

5. Embellish the house further by hot gluing moss, tiny birds, paper flowers and pearl sprays to the houses, roofs and openings. Place the vase in the hole. Fill vase with water and place a fresh flower in the vase.


Rabu, 06 Juli 2011

Plaid Craft TV: Iron-on Nursery Art with special guest Sonya Nimri


Yea, Yea, Yea.....Designer/author Sonya Nimri joins us on Plaid Craft TV for this episode featuring iron-on nursery art! We are also exploring painted polka-dot techniques using house-hold items.


This bonus idea is a quick and simple mobile that is made with ribbon, iron-ons and a dowel rod.

Selasa, 21 Juni 2011

Ikea Hack = Mod Podge Makeover

Pattern Girl - 3 Tiered Stand

This little stand is a bonus project from Plaid Craft TV. It was designed for our Mod Podge Makeover Episode. The stand began as a cookie stand from Ikea and we tricked it out with old book pages and some of my favorite scrapbook papers from Melody Ross.  Since the work is done on the under side of the glass, the stand can be used as a food stand or a stand for jewelry and trinkets.

Materials:
Mod Podge ® Gloss, 8 oz.
IKEA - Tiered cookie stand – clear glass
Decorative scrapbook paper from Melody Ross GCD
Fiskars scissors
Old book pages
Instructions

Let's Make This!
1. Disassemble the stand. Wash the glass plates and thoroughly dry.

2. Cut out the pattern ladies (or a different image) from scrapbook paper.

3. Apply Mod Podge to the top of the pattern ladies cutouts. Place onto the backside (underside) of the glass plates. Press any air bubbles with your fingers.

4. Cut old book pages into squares, apply a coat of Mod Podge to the papers and apply to the plate over the pattern ladies. Top coat with a layer of Mod Podge. Continue adding more book page squares until the entire plate is covered.

5. Do this for each plate. Once they are all dry, reassemble the stand.

Kamis, 09 Juni 2011

Plaid Craft TV: Ikea Hack - Lack Table Makeover


Bold and modern, this flower power table started out as a $7.00 Lack Table from IKEA! The bold painted pattern is achieved with pebble stencils.  The flowers are cut from wrapping paper and then they are attached with Mod Podged to the table top.  The whole top is sealed with a clear spray sealant.


This bonus idea is made with silk flowers, stencils and a store bought pillow. 

Minggu, 22 Mei 2011

Plaid Craft TV: 3 Techniques - 3 Nesting Boxes


Learn to crackle finish, dry brush and sink seed beads into Mod Podge in this 3 techniques - 3 nesting box project.  The techniques can be applied to many different surfaces.


This bonus idea is made by layering paints and papers to create a collage plaque.  The embellishments were hand glittered.  The bird embellishment is from Melody Ross's line of scrapbooking papers for GCD.  For instructions please visit this link. 

Selasa, 17 Mei 2011

Plaid Craft TV: Ikea Hack - Shabby Cottage Inspired Ottoman


Softly, sweetly feminine, this designer ottoman started out as a beige cube from IKEA! Ooolala! Decorative accessories with a European flair add an exotic touch to any room. 

For complete instructions visit this link

Shabby Flower Instructions

This bonus idea is made with burlap and a store bought pillow.  The stenciled Paris is easy to do and the metallic Folkart paint is the bees knees.  For instructions please visit this link.

Rabu, 11 Mei 2011

Plaid Craft TV: Kids Play Kitchen and Toy Cake


Learn How! Watch the Video

A dream-come-true for budding chefs: a pint-size kitchen made with love and FolkArt acrylic paint! Games, make-believe and simply sweet décor have been specially created for the younger set. Stay tuned for all three Kids' Activities segments and bonus projects, too!


bonus idea below!


This bonus idea is perfect making toy cakes, pies or cupcakes.  For this we used recycled elements, paint and styrofoam disks.  For the instructions for the designs pictured visit this link.

Kamis, 05 Mei 2011

Plaid Craft TV: Eiffel Tower Window and Table Top Art


Ooolala! Decorative accessories with a European flair add an exotic touch to any room. Stay tuned for all three Paris Apartment segments and bonus projects, too!  A deceptively simple Gallery Glass technique creates a towering masterpiece on an ordinary poster frame.  For complete written step-by-step instructions - please visit this link.


Tower Template
Click to download and enlarge on a copier.

bonus idea below!

This bonus idea is perfect for using up scraps of leading lines.  Create any small design under the planet.  For the instructions for the designs pictured visit this link

Rabu, 20 April 2011

Plaid Craft TV: Fabric Covered Frames and Lamp Re-Vamp


Watch the Video at Youtube (link soon)


We were so excited to have friend, designer and author Norma Rapko, join us on this segment of Plaid Craft TV.  She shared some easy tips for making fabulous Mod Podge picture frames.  For complete written step-by-step instructions - please visit this link.


bonus idea below! 

This bonus idea is perfect for using up scraps of fabric and trims.  The fabric is attached with fabric Mod Podge.  For the instructions for the designs pictured visit this link!

Minggu, 30 Januari 2011

Day 2 of CHA

 Our display at the Plaid booth.  This is to kick off our new show, Plaid Craft Tv - Coming Spring 2011!

 Mark Montano, Amy Anderson and Michael Jolly.

 Seriously love this product!  Mod Podge is like candy!

 Make and Takes gong down!


 Lots of crafters are loving Hot Glue Gun Helpers!


 Loving my friend Drew the Crochet Dude and his designs!

 Matt and Casey from Plaid Craft TV are filming live from CHA!

 It is a rockin show!

 Drew holding crochet court with the ladies ~ Traci Bautista joins in the fun!
 
 How cute is Sonya!!!  She is going to give birth in two weeks!!

 Amy Anderson from Mod Podge Rocks, Megan Nicolay from Generation T and Plaid Craft TV guest, Sonya Nimri


 Stefanie Girard and Margot Potter joining us at the Plaid Craft TV set.

 Stefanie Girard joining us on Plaid Personalities. 

 me, Vicki O'Dell, Sarah Hodson and Jenny Barnett Rohrs from Craft Test Dummies.

Jumat, 28 Januari 2011

Sneak Peek: Plaid Craft TV


Plaid Craft TV
 Coming this Spring to www.plaidonline.com.

Steve and I are so thrilled to share a sneak peek of our new crafting web-series, Plaid Craft TV!